
Wide Plank Flooring
The bedroom loft looks much different than it did a week ago. We went back and forth on different types of flooring but I kind of figured I'd have to make my own to be able to afford what we wanted. When we finally decided on what look we wanted, we set out to make our own wide plank flooring. It cost $1.25/ sqft including the floor finish.  I bought 1x12x16's of pine from a local lumber yard. We used pine on our downstairs floors and they have held up pretty well. The boards come out to 3/4" thick, 12" wide and 16' long. I ran a tongue-and-groove on them through a shaper and while I was at it, I added a 1/8" x 1/8" reveal to give the planks a defined joint. The first few boards were fine, the other 60 were slightly back-breaking. You can pay the lumber yard to run the tongue and groove for you, if you don't have your own shaper.
  Here's a before of what the floors looked like. See, originally we painted them white, then we painted them sage green.... but after painting the ceiling and walls white, we wanted to get a little grain back into the room. Not to mention, these were really only sub floors so they were never very level or suitable for finished flooring.
  I borrowed a flooring nailer from a friend to nail the boards down which worked great, especially compared to a regular finish nailer like I used downstairs. The flooring nailer has a rest that rides right on the edge of the tongue and fires a cleat at an angle as you smack it with a mallet. It draws the boards up nicely. After all the boards were laid I used a flooring buffer (you can rent them at home depot) with a black stripping pad to just sort of clean up the shoe prints and round the edges of the joints. I sprayed windex on the floor as I buffed it to help with the cleaning. We didn't really want the boards sanded since we wanted a kind of weathered look so the buffing pad really did the trick.
 This is the cool part, I used a wood treatment called ecowood treatment which is pretty reasonable and does something amazing to wood. It sort of instantly weathers the color of the boards and seals it all at once. It comes as a powder that you mix with water and then apply with a brush or mop. It's not a stain at all and does nothing to your hands or skin. I mopped it on the floors with a floor cleaner pad and did the joints with a foam corner brush by hand. Going off of the product description, I bought the 5-gallon pack but could have definitely gotten by with the one gallon. I barely used any really.
 I used Bona commercial HD Extra Matte for the floor finish. It's pretty easy to apply. You pour a portion on the floor and use an applicator pad to mop it on evenly, overlapping each run slightly to keep a wet edge. We bought two gallons which was enough to apply two coats over the entire floor. It dries supprisingly fast so you have to work kind of fast. It was stressful at first but we got the hang of it.
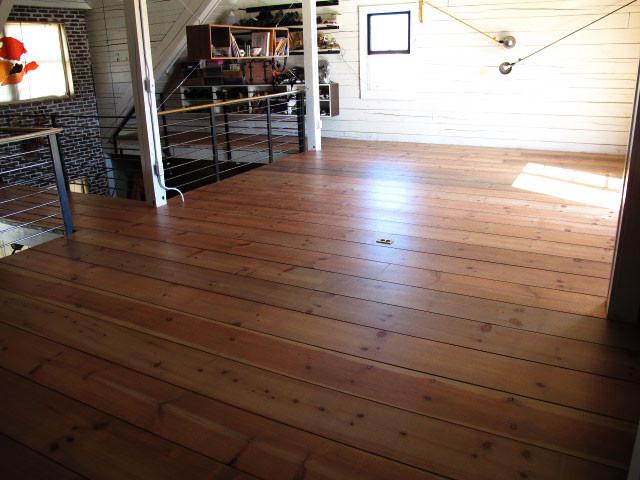
 And these are the floors after the finish dried! Look how amazing the finish made the grain look. Even though we didn't sand the boards the floor is completely smooth and level. $1.25/sqft for solid wood extra wide plank flooring that we are very happy with. It totally changed the look and feel of the room. So much, that I kind of want to redo the downstairs now....
I bought 1x12x16's of pine from a local lumber yard. We used pine on our downstairs floors and they have held up pretty well. The boards come out to 3/4" thick, 12" wide and 16' long. I ran a tongue-and-groove on them through a shaper and while I was at it, I added a 1/8" x 1/8" reveal to give the planks a defined joint. The first few boards were fine, the other 60 were slightly back-breaking. You can pay the lumber yard to run the tongue and groove for you, if you don't have your own shaper. Here's a before of what the floors looked like. See, originally we painted them white, then we painted them sage green.... but after painting the ceiling and walls white, we wanted to get a little grain back into the room. Not to mention, these were really only sub floors so they were never very level or suitable for finished flooring. I borrowed a flooring nailer from a friend to nail the boards down which worked great, especially compared to a regular finish nailer like I used downstairs. The flooring nailer has a rest that rides right on the edge of the tongue and fires a cleat at an angle as you smack it with a mallet. It draws the boards up nicely. After all the boards were laid I used a flooring buffer (you can rent them at home depot) with a black stripping pad to just sort of clean up the shoe prints and round the edges of the joints. I sprayed windex on the floor as I buffed it to help with the cleaning. We didn't really want the boards sanded since we wanted a kind of weathered look so the buffing pad really did the trick. This is the cool part, I used a wood treatment called ecowood treatment which is pretty reasonable and does something amazing to wood. It sort of instantly weathers the color of the boards and seals it all at once. It comes as a powder that you mix with water and then apply with a brush or mop. It's not a stain at all and does nothing to your hands or skin. I mopped it on the floors with a floor cleaner pad and did the joints with a foam corner brush by hand. Going off of the product description, I bought the 5-gallon pack but could have definitely gotten by with the one gallon. I barely used any really. I used Bona commercial HD Extra Matte for the floor finish. It's pretty easy to apply. You pour a portion on the floor and use an applicator pad to mop it on evenly, overlapping each run slightly to keep a wet edge. We bought two gallons which was enough to apply two coats over the entire floor. It dries supprisingly fast so you have to work kind of fast. It was stressful at first but we got the hang of it. And these are the floors after the finish dried! Look how amazing the finish made the grain look. Even though we didn't sand the boards the floor is completely smooth and level. $1.25/sqft for solid wood extra wide plank flooring that we are very happy with. It totally changed the look and feel of the room. So much, that I kind of want to redo the downstairs now....
Leave a comment
Comments will be approved before showing up.
Net Orders Checkout
| Item | Price | Qty | Total | |
|---|---|---|---|---|
| Subtotal |
$0.00 USD |
|||
| Shipping | ||||
| Total | ||||